Boss Breakdown: Metroid Fusion’s Nightmare

In honor of Spook month, I wanted to analyze the design of Metroid Fusion‘s arguably spookiest boss, Nightmare. Certainly a spooky name. I’m fascinated by gameplay that leaves a lasting impact on people, experiences that are remembered long after the game’s last play session. Nightmare seems to be one of those special few bosses that everyone remembers, if they’ve played the game he debuted in. There’s something viscerally haunting about Nightmare in particular that sticks with you. In a game full of terrifying encounters with predatory aliens on an isolated space station, he manages to stand out as this weird, horrific science experiment gone wrong.

In Metroid Fusion you play as galactic bounty hunter Samus, once again finding herself in the unenviable position of being trapped in isolation with ravenous alien monsters that want to eat her face. Unfortunately for them, wanting to eat Samus’s face is the leading cause of death in the Metroid universe, so the player and Samus will team up to claw their way through the abandoned space station to recoup Samus’s gear, destroy the monsters within, and blow the place to kingdom come.

To give a quick rundown of Samus’s capabilities, for those who have not played Metroid Fusion, Samus primarily does a lot of running, gunning, and jumping. Samus can jump high into the air and, at this point in this game, perform the space jump – where she can gain extra height in mid-air as much as she likes, so long as the jump button is pressed just as Samus begins to fall from the previous jump. Think a standard double jump, except with no limits. An infinite jump, a space jump, if you will. She can make herself a smaller target by curling into the morph ball form, with which she can also roll around in tight spaces. Samus can shoot horizontally in basically any position except the morph ball form. She can also aim vertically while standing or jumping, but diagonally upward or horizontally while running as well. Her primary weapon is a beam that can be charged up while moving then released for extra damage, and she has a limited stockpile of missiles she can fire in place of her beam. They do about as much damage as a full charged beam, but have expendable ammo.

Very ominous, the way you keep turning your sprite renderer on and off

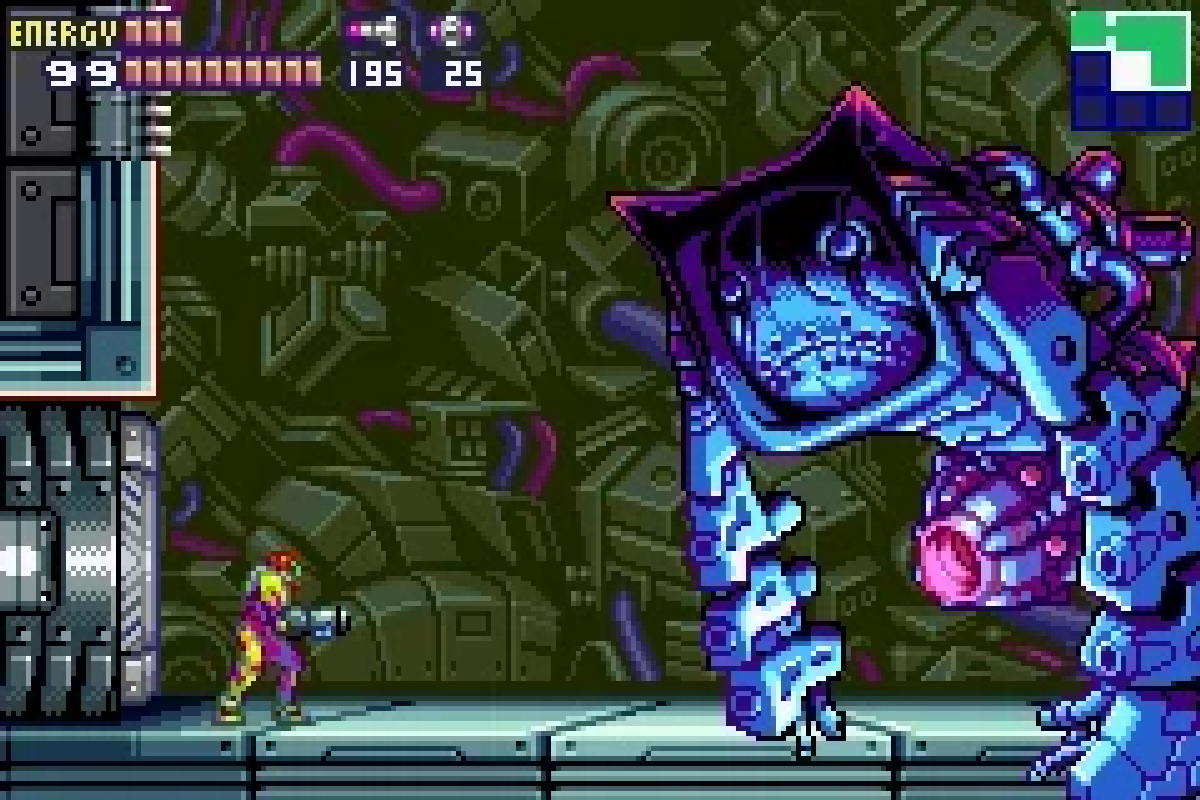
It’s hard to describe what exactly Nightmare is. He’s some sort of awful military experiment with gravity manipulation. It a bio-mechanical monstrosity hooked up to a gravity device, and perhaps some sort of life support apparatus, sealed within with an ominous mask. He has very limited animation, with basically only a few details on his arms and *ahem* face to distinguish him. He kind of just stares in one direction and floats around, but visually it works because of the kind of character he is. He’s pretty horror-themed, with his thousand yard unblinking stare and immovable stance in one direction reinforcing this sort of awful, emotionless terror-machine.

The Nightmare boss fight is made up of three distinct phases that seamlessly transition from one to the other linearly as the Nightmare creature takes damage. As is often standard for 2D action games, Nightmare’s behavior pattern is actually rather simple once you break it down. In the first phase, Nightmare will only do two things. First, he’ll fire a salvo of laser projectiles that move horizontally in a line from his arms. Several are fired at once, forming an obstacle that is just high enough for Samus to be able to jump over, if they’re fired near the ground. This is complicated by the second thing he does; he will track Samus’s vertical position with his own, levitating up and down to match her “y” position on the screen. It’s not one-to-one though, Nightmare overshoots Samus’s position, and if she quickly changes her vertical place, Nightmare will have to take a moment to reorient itself as a result.

This movement creates the sense that Nightmare is an intelligent predator going out of its way to aim its deadly lasers at Samus, although in truth they aren’t aimed as such. Nightmare is repositioning its entire body to fire at Samus. This overshooting vertical motion is a simple and effective way to convey the illusion of intelligence in enemy AI. An enemy that perfect lands its shots every time, with no room for error is even simpler to implement, but it’s not very satisfying to fight against. By having Nightmare overshoot, he seems more alive, with the capability of making error, while staying motivated and on target – he tries to shoot Samus, but does not do so perfectly. Once the player can properly manipulate Nightmare’s movement, they can defeat him much more easily. One could even say that Nightmare’s movement is an extension of the player’s own as Samus. It’s always a response to how she moves, that is then disrupted by the lasers which fire on their own time, beyond the player’s control. Having mechanics interact like this instantly multiplies the number of situations that are possible, and this simple interaction alone drives the entire first phase of the fight.

There’s one more complication, however. Nightmare is immune to Samus’s weaponry on most of his body, vulnerable only at one specific weak point – his gravity device. Dodging Nightmare’s attacks in the first phase is not a terribly daunting task, as again his movement is totally lead by Samus. The position of his weak point forces you to try to manipulate him in a certain way, though, and this may put Samus in harm’s way. It’ll be easier to understand how this work by understanding how Nightmare is shaped:

Very definitely NOT shaped like a friend

As you can see, Nightmare is made up of these four primary parts, very approximately outlined here. None of the areas marked in green can take damage, but the red gravity device can. So now first phase is a game of landing your shot in that small space between his arms, which will otherwise block your fire. Seems difficult, but is thankfully alleviated somewhat by a beam upgrade Samus will have by this point in the game, which makes her shot very wide, so damaging Nightmare requires a precision, but not pinpoint precision shot from Samus. This also means hitting Nightmare is much easier with the charge beam than with missiles, ensuring the player is taking some time to charge up, and therefor interacting with Nightmare’s attack pattern as the fight goes on, none of his mechanics can go ignored. To access this weak point, Nightmare needs to be high enough in the air, and thus the ladder on the back wall Samus can use to goad him into exposing himself. This little scenario will also give the player ample time to observe and learn about how Nightmare’s movement works. If the player can successfully repeat this cycle a few times, Nightmare will activate his gravity field, and we enter phase 2.

Shaped like an enemy, even

Nightmare’s gravity field makes Samus heavier, causing her jump to get a lot less airtime, and her running movement to be a lot slower. At the same time, Nightmare will be encroaching on Samus slowly, characterizing a very off-kilter and haunting vibe. Nightmare does not track Samus’s position here, but rather simply bobs up and down a short distance. This happens rhythmically and regularly. He notable stays in his higher position for a longer time than his lower position, designed such so that the player has time to aim a beam shot at the gravity device. His lasers now fire only two at a time, so Samus’s shorter jump can clear them, but they follow their own regular timer that is desynched from Nightmare’s movement, meaning they can fire at any vertical “Y” position, so the player will have to duck or jump the lasers on the fly. This shift to a more reaction-focused mechanic reinforces a sense of being on the backfoot, of the terrifying creature closing in you, literally forcing you into a corner.

Similar pattern, new context

The method of attack remains the same here, but it’s re-contextualized, as Nightmare now moves of his own accord, meandering around like a zombie, rather than following your lead. He reminds me of a horror-movie monster, the way he sort of just vaguely shambles toward you. The fight remains simple, but the distortion of the environment, the ooze dripping from his eyes, and the ominous humming of his gravity device, along with the subtle shift of the mechanics toward reaction-based gameplay really sets the mood. The aesthetics do a lot of work here, creating a building tension going into the third face, er, I mean phase, which starts with..

AAAAAAH DIE DIE DIE DIE DIE DIE DIE DIE DIE DIE DIE DIE DIIIIE

HOLY mother of god what IS that!? Augh, yes his mask comes off to reveal this grotesque melting abomination once you’ve destroyed the gravity device. At this point Nightmare will gradually move toward you, firing lasers in a new much more aggressive pattern, forcing Samus off the ground. If Samus tries to jump over Nightmare, he will fly off screen then back on in an attempt to ram her. Nightmare is responding to Samus’s movements again. It’s more obscure and aggressive, but still predictable. Once you understand that bosses like Nightmare are only responding to their circumstances (aka you, The Player), you can predict how they’ll react and use that to your advantage, and this applies to pretty much any AI enemy. Incidentally, this is largely how competing against real people in games works, too, although they might be a bit smarter than Nightmare. At any rate, he’s now vulnerable to missiles, so blast his exposed face to smithereens. It’s a lot easier to damage him in this phase, so it’s simultaneously cathartic as his increased aggression continues to build tension. The extra room and freedom to move about more of the arena creates a sense of a shift in tone. Samus is now in a position of greater power, and Nightmare a position of greater desperation, to match his screeching unmasked face.

Oof

It’s worth going over here a kind of ‘soft’ phase 4 for Nightmare. Nearly every boss in Metroid Fusion, once defeated, releases its Core X, a parasitic creature that contains some of their power. Samus must defeat this as well, before she can breathe a sigh of relief. The Core X is a pretty simple floating target that can be taken down with a few missiles. Beam attacks don’t damage it, but they do release some health and ammo restoring items. The Core X’s behavior is to simply follow Samus’s current position, and move towards her to ram her. You’ll notice it uses that same ‘follow but overshoot’ technique Nightmare employed, except in both the horizontal “x” and vertical “y” positions. If you know to look for it, you’ll see this mode of movement in AI design everywhere. I always found these Core X encounters a very interesting kind of denouement to boss fights, where there’s still some danger, but not nearly so much, as the heightened tension eases out. It’s a pretty satisfying cap off to hard encounters, and not many games do anything similar. It’s unique.

Wobble wobble wobble

It seems to be the case that Nightmare’s design is intended to exercise all of Samus’s mobility options. The presence of a ladder on the back wall gives the player easy access to the air above Nightmare for some evasive space jumps, certain Nightmare attacks are best evaded by Samus’s famous morph ball, and a command of Samus’s ability to fire diagonally while moving gives a huge advantage in this fight. Nightmare is one of the first bosses in Metroid Fusion that really pulls together a lot of Samus’s various capabilities, and, even though he’s rather simple and straightforward, he does a great job of it. He marks the beginning of the endgame sections of Fusion, and can be a bit of skill check for people, so they may very well get stuck on him for a time. This coupled with the outstandingly horror-filled atmosphere that follows from his horrific design, reinforced by AI behavior reminiscent of a lumbering horror villain, and you’ve got a recipe for an extremely memorable encounter.

This thing is out of control. Hurry before it destroys the entire station…

Healing in Hollow Knight

It’s spooky season, and I’m gonna talk about one my favorite spooky games, Hollow Knight (Science fact: a game doesn’t have to be scary, to be spooky). I mean, hey, it’s got ghosts and zombies and curses and lots of tombstones, so it counts. Hollow Knight is a 2017 side-scrolling 2D action game. It has other genres too, but I won’t be getting into that, an interesting topic in itself. Mainly I want to look at its very elegant combat system, specifically the way it handles health and healing. In Hollow Knight you play as The Knight, a mysterious little guy wandering a vast, sprawling underground kingdom of bugs once teeming with life, now racked with curses, beasts, and sorrow. Everybody, you included, in this game is a bug, if that wasn’t clear. Lot’s of danger out there for a bug. You’ll get into plenty of scrapes, and will need a reliable way to patch yourself up after a fight. Thankfully, you obtain the ability focus pretty early on, which allows The Knight to restore health by expending a resource called SOUL.

So what design purpose does a healing spell like this serve in a game? If you think about it, the presence of a heal really just artificially extends the number of mistakes a player can make before triggering a fail state. Why not just extend their health pool? What is the advantage of a healing spell? There are a number of reasons you can put something like this in your game. Healing hides information from the player, in particular how long they can survive encounters, making their success and failure less certain. A healing system can act as a safety net against frequent failure states for less skilled players to lean on. Hollow Knight accomplishes these things with its healing system, as its an exploration-based game that requires long ventures between check points. As to why Hollow Knight uses a certain specific implementation of healing in particular, I think it serves three primary purposes.

  1. Creating tension
  2. Teaching situational awareness
  3. Allowing meaningful decision-making on the part of the player

I will elaborate, but.. Okay first, it’s time for some math. To heal, The Knight need only stand still and concentrate for precisely 1.141 seconds. This will restore one unit of health, which usually translates to one hit of damage from an enemy. For each subsequent 0.891 seconds The Knight holds focus uninterrupted, another unit of health will be restored. This costs the resource SOUL, like I said, and this resource is accrued whenever The Knight deals damage with a melee attack to an enemy. SOUL has a maximum value of 99, and it costs 33 to restore each unit of health. 11 SOUL is restored to The Knight each time an enemy is struck by the melee attack. This means, from a full SOUL meter, the player can restore 3 hits of damage to their health. For each additional unit of healing, they’ll need to successfully strike the enemy 3 times. In other words, to succeed in Hollow Knight you’ll need to be hitting an enemy while receiving damage at a ratio of 3 to 1, while successfully casting your focus spell without being interrupted, of course.

With this system, you just have to be good enough. Comforting, in the dark caverns of Hollownest

Those time figures, 1.141 and 0.891 seconds, seem awfully precise, and that’s probably because they are. My thinking is that these figures were arrived at after extensive playtesting against Hollow Knight‘s wide variety of enemies and bosses. Because The Knight needs to stand absolutely still during that roughly one second of time, it was pretty essential that it’s possible to safely do so during boss fights without being interrupted, otherwise the healing ability would be completely useless. However, if it was always safe to do so, or if the safe windows of time in which the healing could be done were always obvious or easy to react to, the game’s challenges and combat gameplay could be in danger of being trivialized. That being the case, I don’t doubt that a lot of consideration was put into these figures, as they carry the heavy burden of creating tension during combat encounters. A lot of that tension happens in the final moments of the focus healing animation. You may find yourself waiting with bated breath as that one second of focus seems to stretch out to years, an angry bloodthirsty beetle bearing down on you.

Hollow Knight‘s combat can be broken down into small-scale, medium-scale, and large-scale encounters. Large-scale encounters are things like boss battles and long gauntlets of enemies. Small-scale encounters are the moments of fighting against smaller enemies found wandering around the world. Medium-scale encounters can be found somewhere in the middle, being rooms full of those small-scale encounters like enemies, or tougher enemies strategically placed to challenge the player. The healing system in Hollow Knight needs to be versatile and universal enough to function in any of these situations. During and after fights against small enemies, the healing focus spell can usually be used pretty safely, without interference, as enemies can be easily retreated from. Resources for healing are provided in return for successfully striking enemies, so as long as the player is engaging with the combat to a certain minimum level of success, these small encounters will provide some sense of danger without bringing the player closer to failure. On a medium-scale, the healing system being so tied to successful combat helps keep an encounter’s obstacles threatening. It is possible to bypass much of Hollow Knight‘s dangers without fighting, but if a slip up is made, no additional resources can be obtained without engaging an enemy. This ensures the player is consistently engaging with the game’s mechanics, and learning to fight as they explore. Ironically, although the healing system exists to keep the player safe, the way it works, hinging on a delicate balance of risk and reward, promotes engaging with the game in such a way that tension is built, and that there remains an ever-present sense of danger.

Not minding your spacing or timing can get you into trouble

Large-scale encounters are where things get really interesting. If the player can heal indefinitely, then how do you build tension in a boss encounter, when the player should theoretically be in the most danger? This is where the ratio of how many hits a player needs to land to restore health, how quickly a heal can be executed, and how frequently a boss attacks the player had to be tightly balanced. As the game goes on bosses will provide smaller and smaller windows of time for the player to heal, but there always must be some possibility of healing or else the system would feel broken. At the same time, by requiring those three all-important melee attacks of the player before allowing them to heal, engaging with the boss’s combat mechanics is essentially enforced, with that aforementioned ratio of hitting-to-getting-hit acting as a sort of design guide for how boss fights should be structured. It gives the designers a pretty good barometer for how to tune the difficulty of Hollow Knight‘s fights. ‘At any given point in the game, the player should be averaging 3 hits against the boss for every 1 hit they take, if they are to defeat it’.

Boss enemies will give you plenty of space to heal, the key is knowing where to find it

This all of course assumes the player can successfully heal against frantically aggressive bugs (the creepy crawly kind, not the game-breaking kind) that want to kill them. Knowing when to attack and when to heal is one of Hollow Knight‘s most essential skills, and it ties in with that relative spacial awareness I’ve mentioned in other topics. The focus spell teaches the player to keep their eyes open for the various tells and telegraphs of their opponent, to be aware of their Knight’s relative position to the enemy, and how to exploit gaps in the enemy’s activity. Utilizing and capitalizing on situational awareness is one of the best ways to make a player can feel powerful or skilled, as though they have some secret knowledge that puts them above the opposition. Gently nudging the player to get good at sneaking in healing spells in-between the boss’s attacks reinforces that feeling. Making meaningful decisions is also how a player stays interested and invested in a game, it’s how to make their agency in the play space feel impactful. Deciding when to start up a heal in Hollow Knight is a meaningful decision, but the game pushes this idea further.

Using SOUL to attack is a risk as you can see in this clip of Hornet… basically whupping my ass

You see, SOUL can be spent not only on healing spells. Early on The Knight will obtain a projectile attack spell called vengeful spirit that deals even more damage than their normal melee strike. Other attack spells will also be obtained at various points throughout the game. These attack spells draw on the same SOUL resource, and cost the same 33 point value as a heal. Suddenly, the player has options in combat. Heal one hit of damage, or deal extra damage? It’s very tempting to go aggro with those powerful spells, especially against tough enemies with deep health pools. If they die quicker, that’s less time the player’s spent potentially making mistakes, after all. So now the player is being made to think critically about the overall situation, weighing their intake of SOUL versus how often they need to heal, factoring in their confidence in their own abilities into how SOUL should be spent. It becomes a series of interesting decisions all happening in rapid, in-the-moment succession. It makes the combat overall more interesting, while also rewarding mastery of the game, as skilled play will allow the player to launch the satisfying and crunchy magic attacks more often while healing less, defeating enemies and bosses more quickly.

As you can see in this clip, I make the impactful, meaningful decision to fail spectacularly

So Hollow Knight‘s healing system accomplishes a lot by playing with the player’s investment of time, sharing a resource with the player’s offensive magic, and tying its efficacy to the player’s success in combat. It creates a satisfying risk-reward experience where the risk is determined by the player’s skill and self-knowledge, as well as a tense and exciting atmosphere in combat.

Very tense. The Knight nearly pee’d their pants here. Do bugs wear pants?

I think it’s worth considering some alternative healing systems games similar to Hollow Knight often employ. Hollow Knight lets you heal indefinitely so long as your combat performance is up to a certain par, but some games will put a hard limit on how much healing you can do before reaching a checkpoint, potion shop, or other such demarcation. Limited quantity healing systems do have some unique strengths. They still give the player ultimate agency over whether and how to use healing resources, like in Hollow Knight, but also give an emphasis on a player’s overall performance, rather than Hollow Knight‘s more moment-to-moment focused system. You can make a lot of mistakes in Hollow Knight but still recover to full strength with some acutely skilled play. With limited quantity healing, you can succeed with skilled play even if you make a lot of mistakes, but the tension will remain high when you’re all out of healing, as your mistakes cannot be undone. Both systems have a lot of potential, depending on what player experience your design is geared toward. I think Hollow Knight‘s implementation is pretty perfect for its world design. With fewer check points and an emphasis on prolonged exploration, it makes sense to make The Knight’s healing resources theoretically indefinite.

Another alternative is health pickups, a very common healing system. In game series like Metroid and Mega Man you can restore health through health pickup items randomly dropped by defeated enemies. This accomplishes a similar end as Hollow Knight‘s healing system, with a safety net against failure being rewarded for successfully fighting enemies. There are a couple of key differences though. For one, health pickups are usually randomly generated by defeated enemies to keep the flow of healing less continuous, and more uncertain. There is a certain excitement unique to finding a healing item right when you most need it. During extended combat encounters without an abundance of targets, such as during a boss fight, naturally there won’t be any health pickups. Games with a health pickup system often try to circumvent this latter issue by throwing smaller enemies into the middle of boss fights that drop health pickups, but that comes with a couple of problems too. For one, the presence of smaller enemies in a boss fight can distract from the fight’s core mechanics and design appeal, especially if it’s meant to be a pitched duel between some important character and the player. For another, that scenario is now rewarding healing for engaging with the small enemies, rather than fighting the boss directly, which may not be the intended experience. Players might spend a lot of time only engaging with smaller enemies to collect health pickups, and ignore the boss. The alternative is simply balancing boss fights such that players aren’t expected to heal during them, or having the boss themselves drop health pickups at various times, but at that point your creeping awfully close to Hollow Knight‘s rather elegant solution anyway.

That elegant solution is not the best way to do healing necessarily, no design scheme is objectively the best one in every situation. It may just be the best one for Hollow Knight though, and it’s hard to argue with the precision of its implementation.

Whew! Got through an entire gameplay analysis of Hollow Knight without once mentioning Dark Souls… wait, damn it.

*Sighs* Bafanada…